Why a Dedicated IP Camera Placement Tool Makes Planning Easier
@ipcameraplacementtoolblog
November 4, 2026 · 8 min read
I have spent more afternoons than I can count standing in empty parking lots with a clipboard, a tape measure, and a mental image of what a security camera should see. You do that long enough, you start to notice patterns. The same blind spots appear again and again. The same assumptions about field of view get proved wrong the moment you load the footage. After a while, you stop trusting gut feel and start looking for a better way to predict what a camera will actually capture before you climb a ladder with a mounting bracket and a drill.
The short answer is that an ip camera placement tool can save you those wasted trips and the expensive do-overs that follow them. But the tool has to be the right kind, built for the specific problems that come with designing a CCTV system, not a generic drawing app with a camera icon slapped on top. I have tried both, and the difference matters.
What a Placement Tool Actually Does
A good ip camera placement tool does not just let you drop dots on a map. It forces you to think about lens selection, mounting height, and the real geometry of a scene. When you place an IP camera in the tool, you should be able to define its focal length and see how that changes the field of view on the floor plan. You should be able to check whether a given resolution can deliver license plate recognition at the far end of a car park, or whether you need a second camera with a longer lens to cover that zone.
The best tools also handle the practical constraints that trip up real installations. PoE distance limits, for example. If you set a camera two hundred metres from the nearest switch, the tool should flag that you need a PoE extender or a different network topology. That kind of feedback keeps you from designing a system that looks perfect on paper but fails during cable management on site.
Moving Past the Paper Sketch
I still remember my first big commercial job, a warehouse with racking that went up to six metres. I drew the coverage map by hand on a set of architectural prints, guessing where each camera would aim. On the day of installation, we discovered that one of my carefully planned cameras had its view completely blocked by a structural column I had not accounted for. We had to move the camera, run a new cable, and patch a hole in the drywall where the original mounting bracket had been. That mistake cost a full day and a chunk of the profit margin.

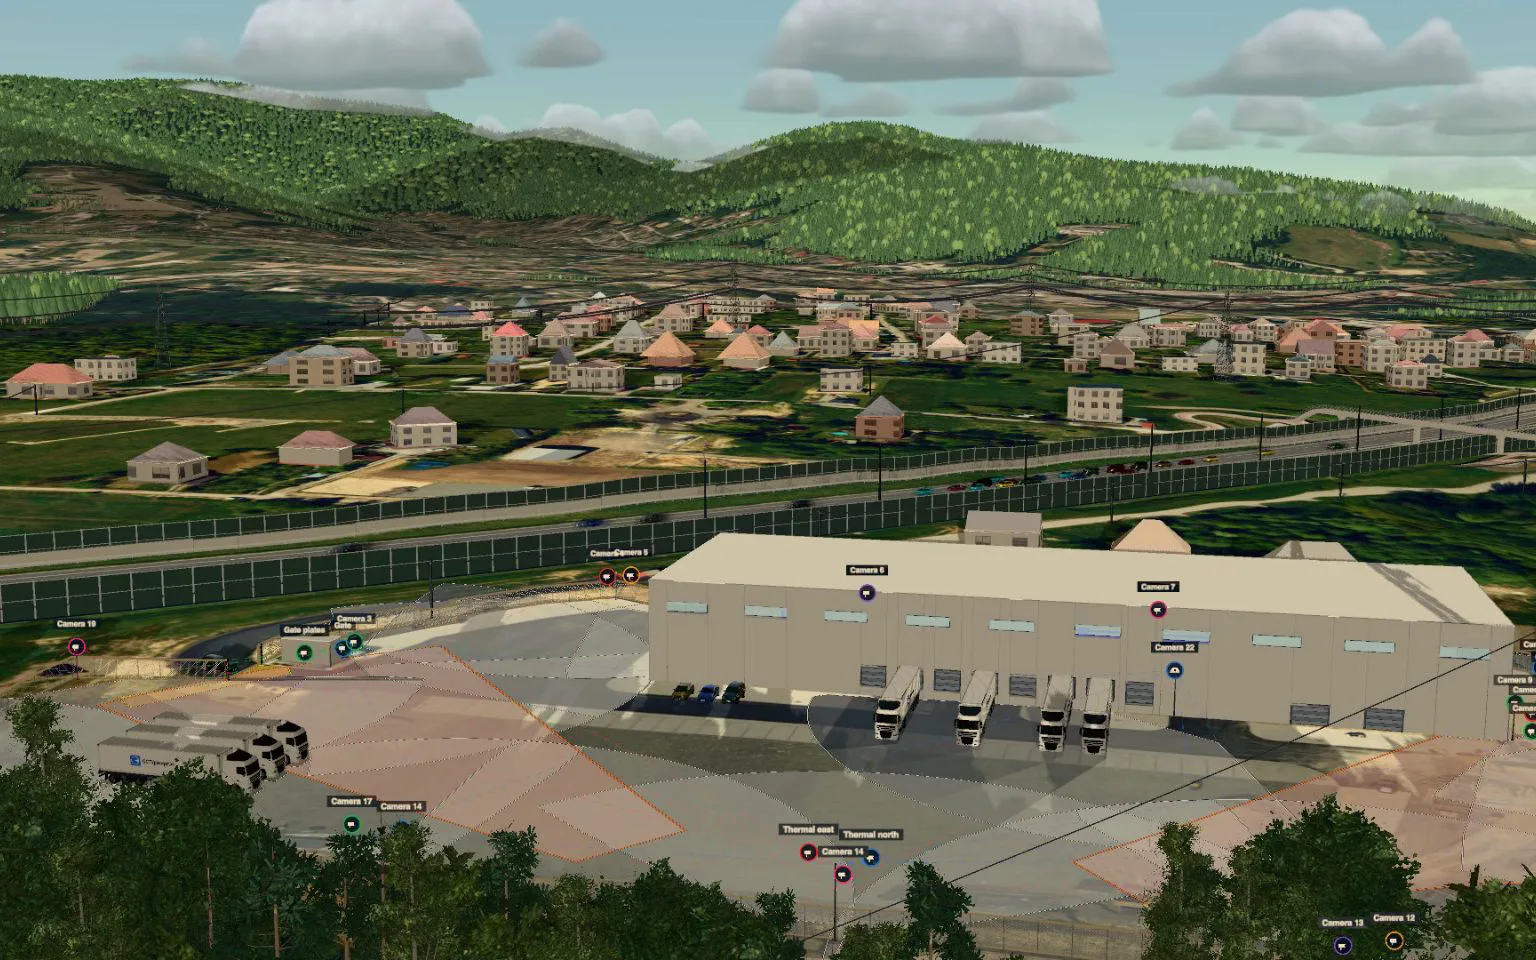
If I had used an ip camera placement tool back then, I could have imported the floor plan, set the camera positions, and checked the field of view against the actual obstacles. The tool would have shown me the blind spot behind that column before I ever touched a drill. That is the real value of a dedicated CCTV planning tool. It turns guesswork into a measurable, repeatable process.
Key Factors the Tool Should Help You Evaluate
When you evaluate any placement tool, look for the features that mirror what you would check in a physical site survey. Here are the ones I consider essential:
- Lens and focal length simulation. The tool should let you select a lens, from a wide-angle 2.8 mm to a telephoto 12 mm or more, and see exactly how that changes the coverage area. A wide lens might cover a whole room but fail to deliver useful resolution for license plate recognition at the door. A narrow lens gives you detail but leaves gaps. The tool should make that trade-off visible.
- Resolution and pixel density mapping. Not all cameras are created equal. A 2 MP camera and an 8 MP camera pointed at the same spot produce very different usable images. The tool should show you the pixel density at the far edge of the field of view so you know whether that camera can do what you need, whether it is motion detection in a narrow corridor or night vision over a loading dock.
- Obstacle and elevation modelling. Walls, columns, racking, and even large furniture affect what a camera can see. A flat coverage map that ignores these features is little better than a sketch. The tool needs to let you mark obstacles and adjust mounting height so the simulation matches the real site.
- Export for client proposals and technical drawings. After you finish the layout, you need to hand the plan to the client and to the installation crew. A tool that generates a clean coverage map and a bill of materials saves hours of manual drafting. It also makes your proposal look professional, which matters when you are competing for a contract.
How It Changes the Way You Work
Once you start using a proper planning tool, your workflow shifts. You still do a site survey, but the survey becomes more focused. Instead of just walking the property and taking notes, you measure distances, note obstacles, and check ceiling heights with the tool in mind. You return to the office and load those measurements into the software, placing each security camera with the confidence that comes from seeing the coverage area before you commit.
I have found that the tool also changes how I talk to clients. Instead of saying "I think a camera here will cover the entrance," I can show them a coverage map with the field of view overlaid on their own floor plan. They see exactly what the camera will capture and what it will miss. That transparency builds trust. It also heads off the late-stage requests for additional cameras because the client did not understand the limitations of a single lens.
Another benefit is consistency. When I design multiple systems for a client with several locations, the tool helps me standardise the approach. I can save templates for a typical retail store layout or a warehouse configuration, then adapt each one for the specific site. The resulting systems are more uniform, which simplifies maintenance and troubleshooting for the client's security team.
Practical Considerations for Installation
A placement tool is not just for the design phase. It feeds directly into the installation process. The tool's output should include cable lengths, PoE budgets, and mounting bracket specifications. That information lets the installer pre-cut cables, pre-configure the NVR, and stage the equipment before arriving on site. I have seen installation times drop by nearly a third when the crew has a detailed plan from a good tool.
It also helps with the less glamorous parts of the job, like cable management. If the tool tells you that a camera needs to be mounted on a concrete wall twenty metres from the nearest switch, you can plan to run conduit or use a weatherproof junction box before you get there. You can order the right length of cable and the right connectors. No last-minute trips to the supply house.
And there is the matter of deterrent signage. Many clients want signs that state the property is under video surveillance. A good tool can help you note those locations on the plan so the installation crew puts them up while they are still on site, not weeks later when someone notices they are missing.
Limitations and Realistic Expectations
I should be clear that no tool replaces a physical site survey. You still need to walk the property, check lighting conditions, and note environmental factors like extreme temperatures or corrosive atmospheres that affect weatherproof ratings. The tool is a planning aid, not a substitute for experience. But it makes that experience go much further.
Also, not every tool handles every camera type well. Some are better suited for fixed cameras; others excel at PTZ layouts. If you work with a mix of fixed IP cameras and pan-tilt-zoom units, make sure the tool supports both. The same goes for specialised cameras like those used for license plate recognition, which have very specific placement and angle requirements.
Finally, be mindful of the learning curve. I have seen installers give up on a good tool because they tried to use it once, got frustrated, and went back to paper. It is worth spending a couple of hours working through a sample project, even if that project is just your own house. Once the layout logic clicks, the tool becomes an extension of your own planning process.
Closing Thoughts
If you design CCTV systems for a living, or even if you only do it occasionally for your own business, a dedicated planning tool is one of the best investments you can make. It reduces errors, saves time, and produces better results for your clients. The next time you start a project, consider opening an ip camera placement tool before you open a fresh floor plan. The coverage map it generates will be more accurate, and your installation crew will thank you for it.